Operator
Manual
A practical guide to using ParkingPro Cloud day to day at the lot, from opening the register to closing out your shift.
Hierarchy: each client account has admins and operators. The admin configures the business and creates operators. Operators run daily operations only and cannot create users or change settings. The ParkingPro Cloud global super admin is separate.
Before you start
-
Install the app on the phone
Open the link your provider gave you in Chrome (Android) and tap "Install app on this device". It ends up like a regular app, with an icon on the home screen.
-
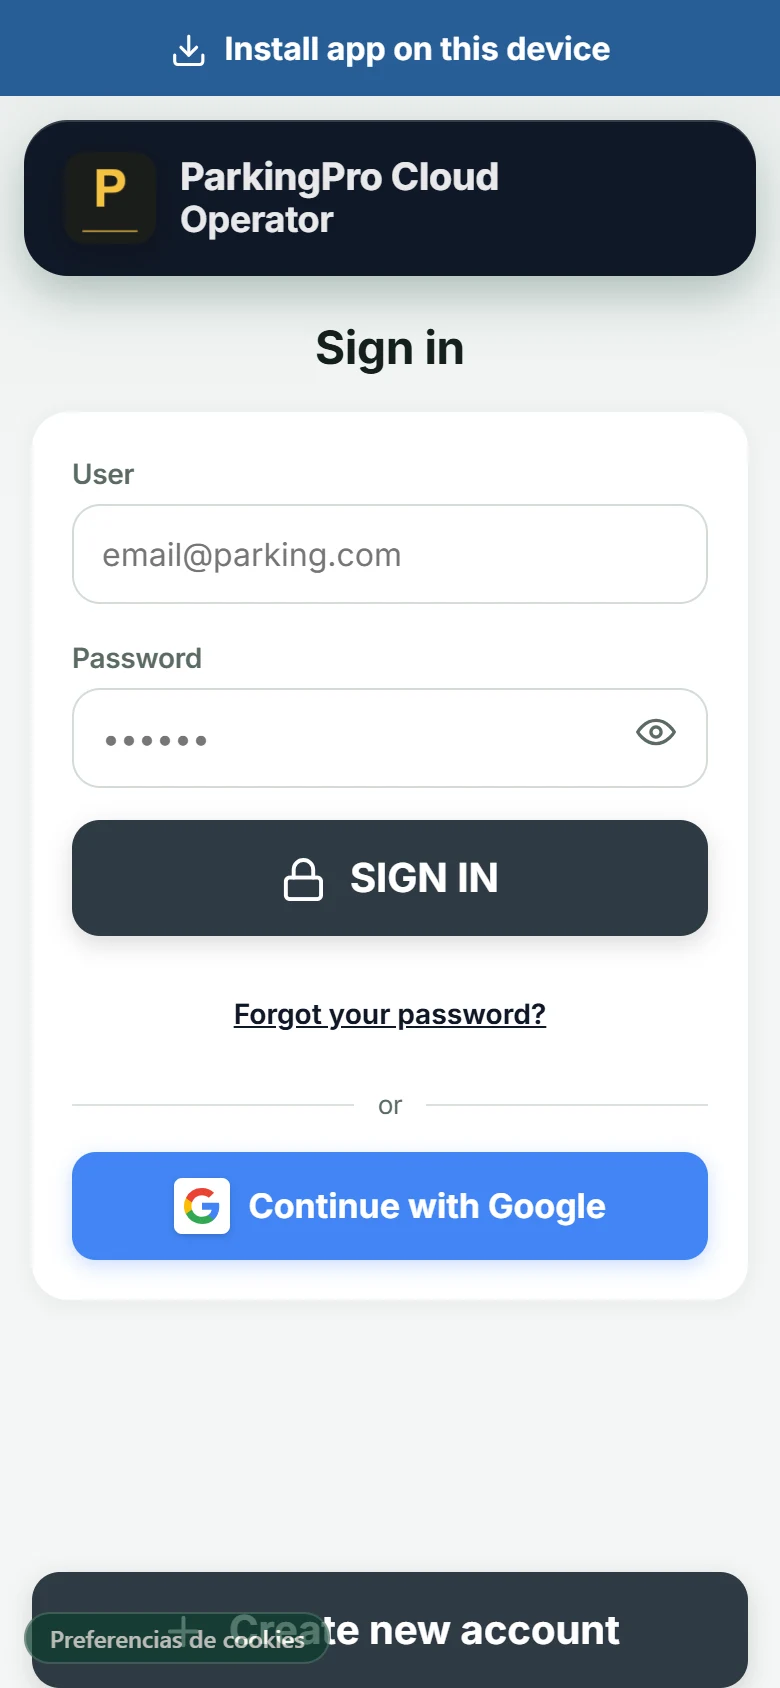
Sign in
Enter your email and your password; the system recognizes your business from the email, no separate code needed. If you get it wrong several times in a row, the system blocks further attempts for 5 minutes; that's normal, just wait and try again.
-
Or sign in with Google
The administrator must first create your account under Administration → Operators using your exact Google email (with or without a password: either way you get an invite email; leaving it blank makes it a Google-only account). Tap Continue with Google on the sign-in screen and select that same email. Google verifies your identity; it does not create a parking business or grant permissions automatically; it only works if the administrator already added you with that email. An administrator's sensitive financial actions may request the internal password as an additional confirmation.
Open the register
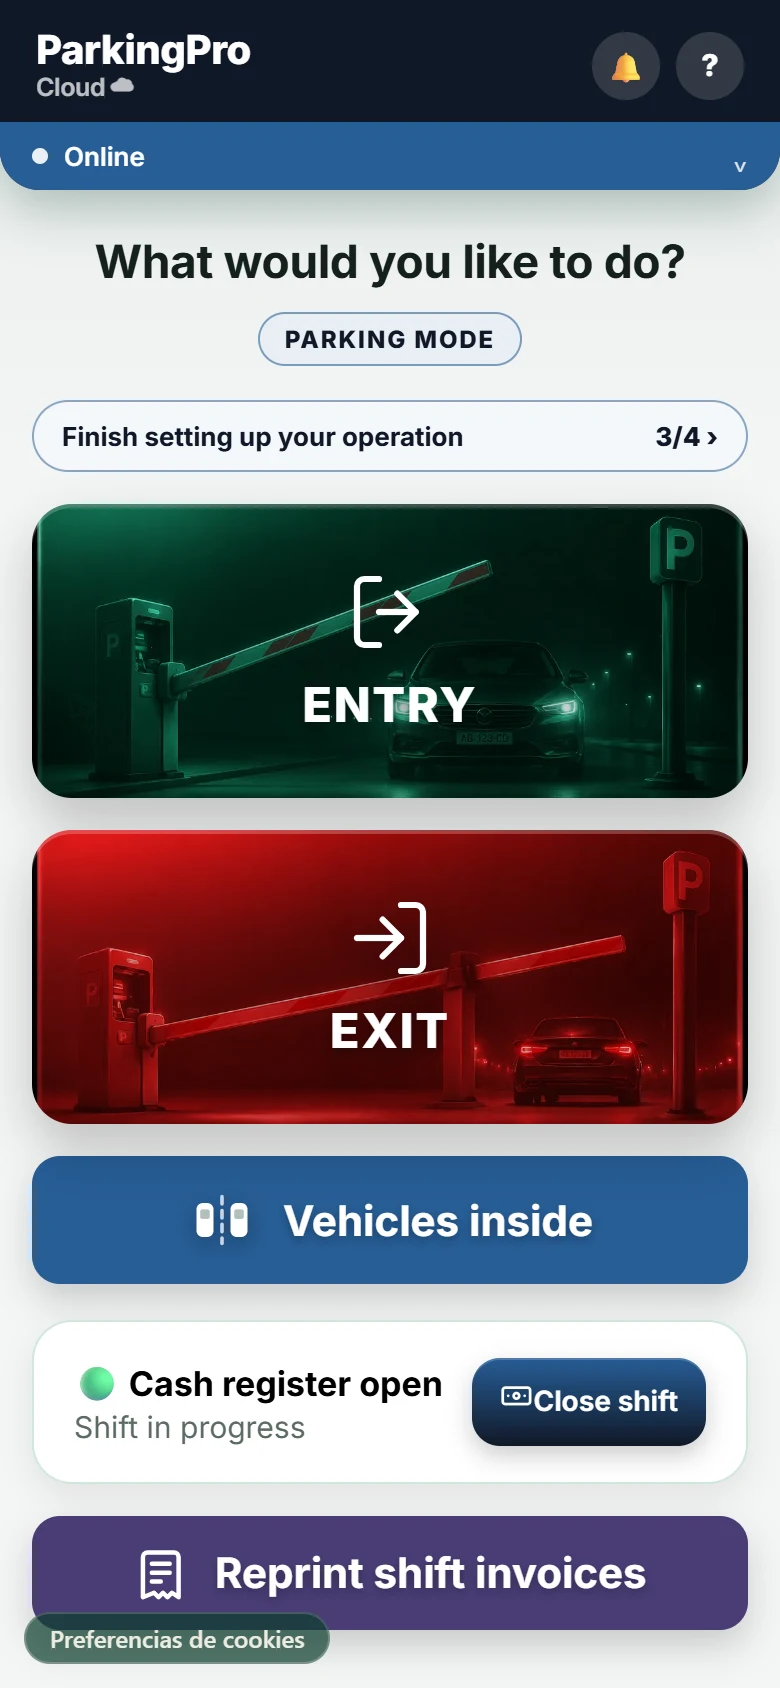
Before you can take any payment, each operator has to open their own register. From the main menu, tap Open cash register and enter the opening float (the money you begin the shift with).
Log a vehicle in
-
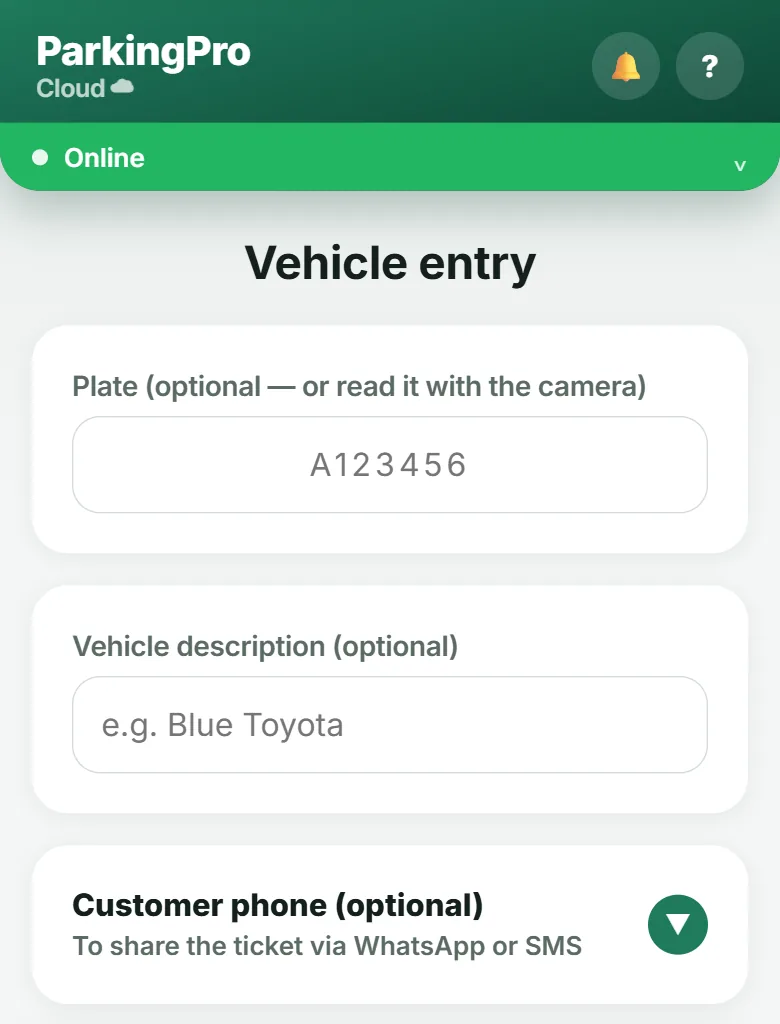
Tap ENTRY on the menu
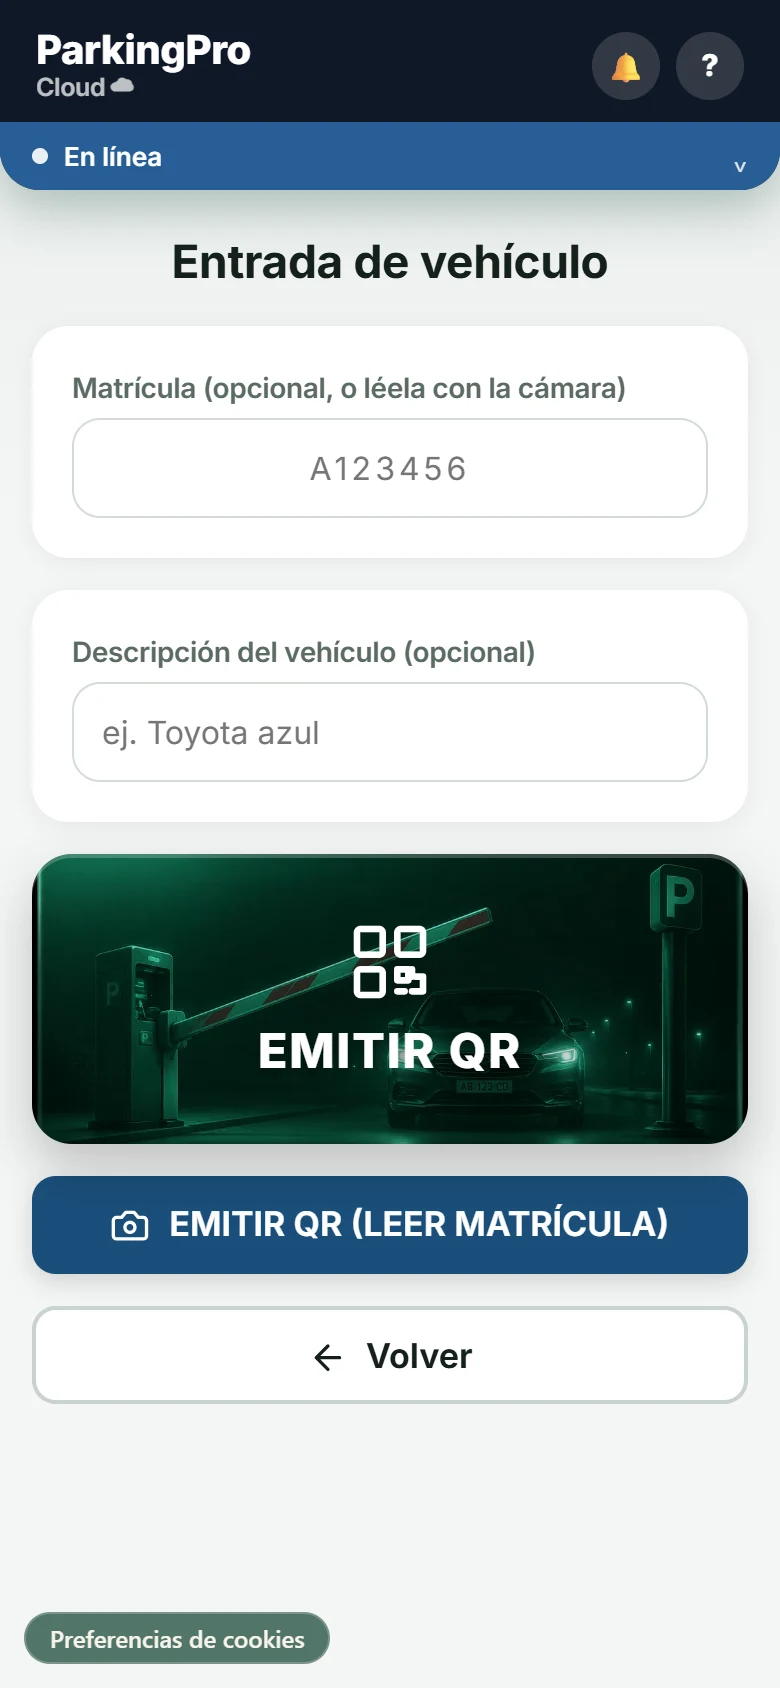
The camera opens automatically to read the license plate.
-
Scan the plate (or type it in)
Point the camera at the plate and tap "ISSUE QR". If the camera can't read it clearly or the vehicle has no plate, type the number in by hand or tap "ISSUE QR WITHOUT PLATE".
-
(Optional) Customer's phone number
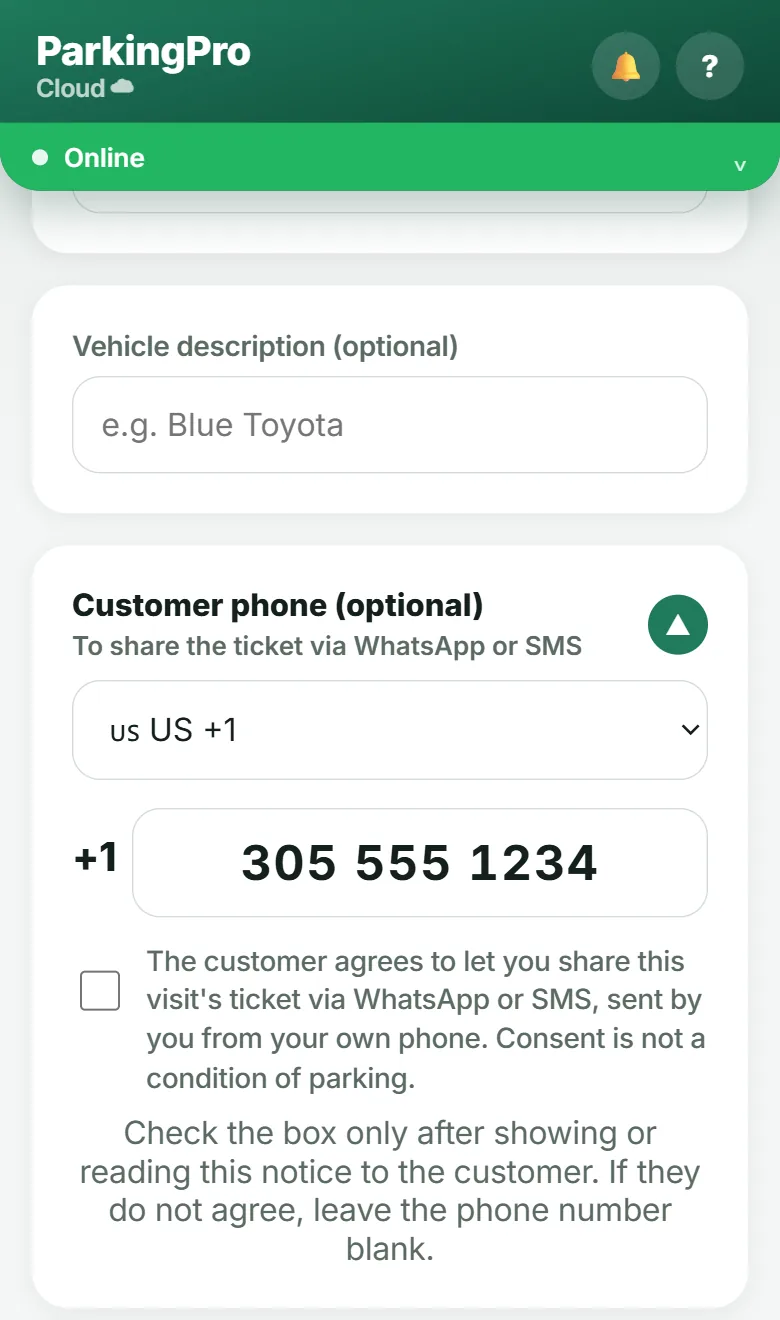
Below the plate field there's a collapsed row that says "Customer phone" with a ▼ arrow, easy to miss. Tap it to expand it. See Share the ticket via WhatsApp/SMS for the full step-by-step.
-
Print the ticket
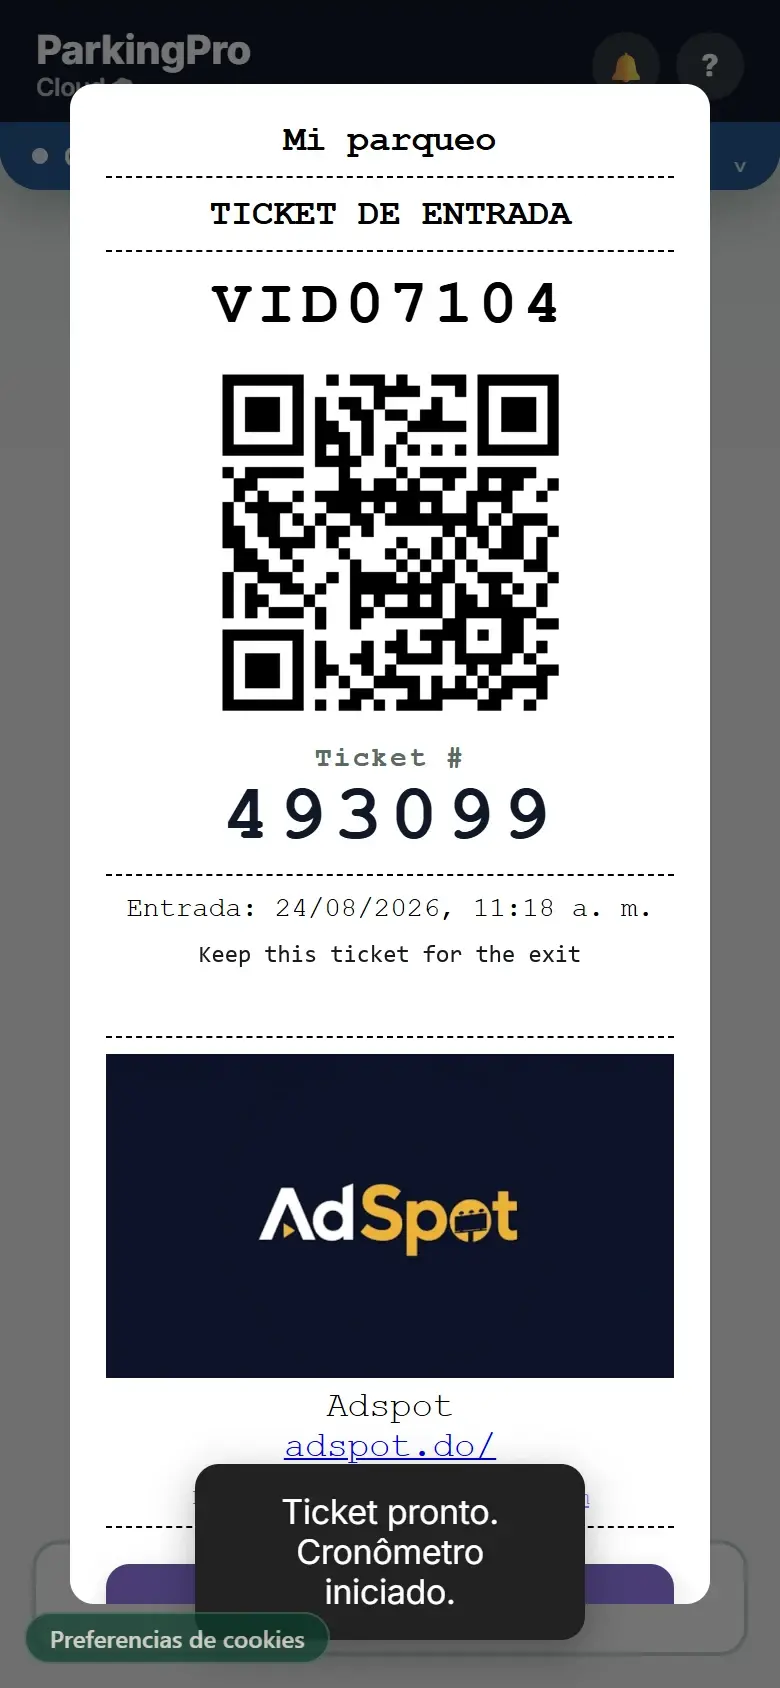
The system generates a unique QR code and a ticket number. Hand the printed ticket to the driver; they'll need it to get out.
Share the ticket via WhatsApp or SMS
-
Expand the phone field
On the Entry screen, tap the "Customer phone" row (with the ▼ arrow) to expand it. It's collapsed by default; if you never tap it, you'll never see this option.
-
Type the number and check consent
Enter the customer's phone only after showing or reading them the notice on screen, and check the box. If they decline, leave the phone blank; consent is not required to park.
-
Issue the ticket
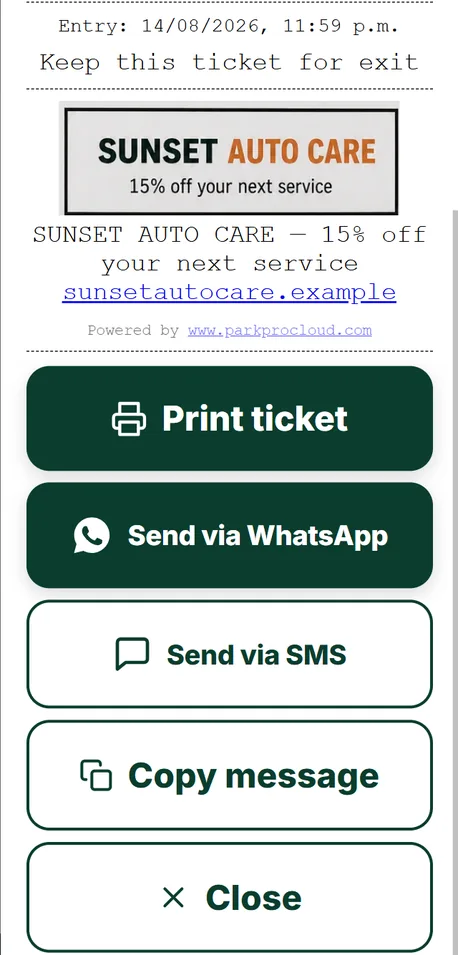
With the phone saved, the ticket screen shows "Send via WhatsApp" and "Send via SMS" buttons: one tap opens your own messaging app with the message and ticket link already written. No account or extra setup: the message goes out from your own phone.
Log a vehicle out and take payment
-
Tap EXIT
Scan the QR code on the ticket. If the ticket was lost or the QR won't scan, you can type the ticket number in by hand, or look the vehicle up by plate.
-
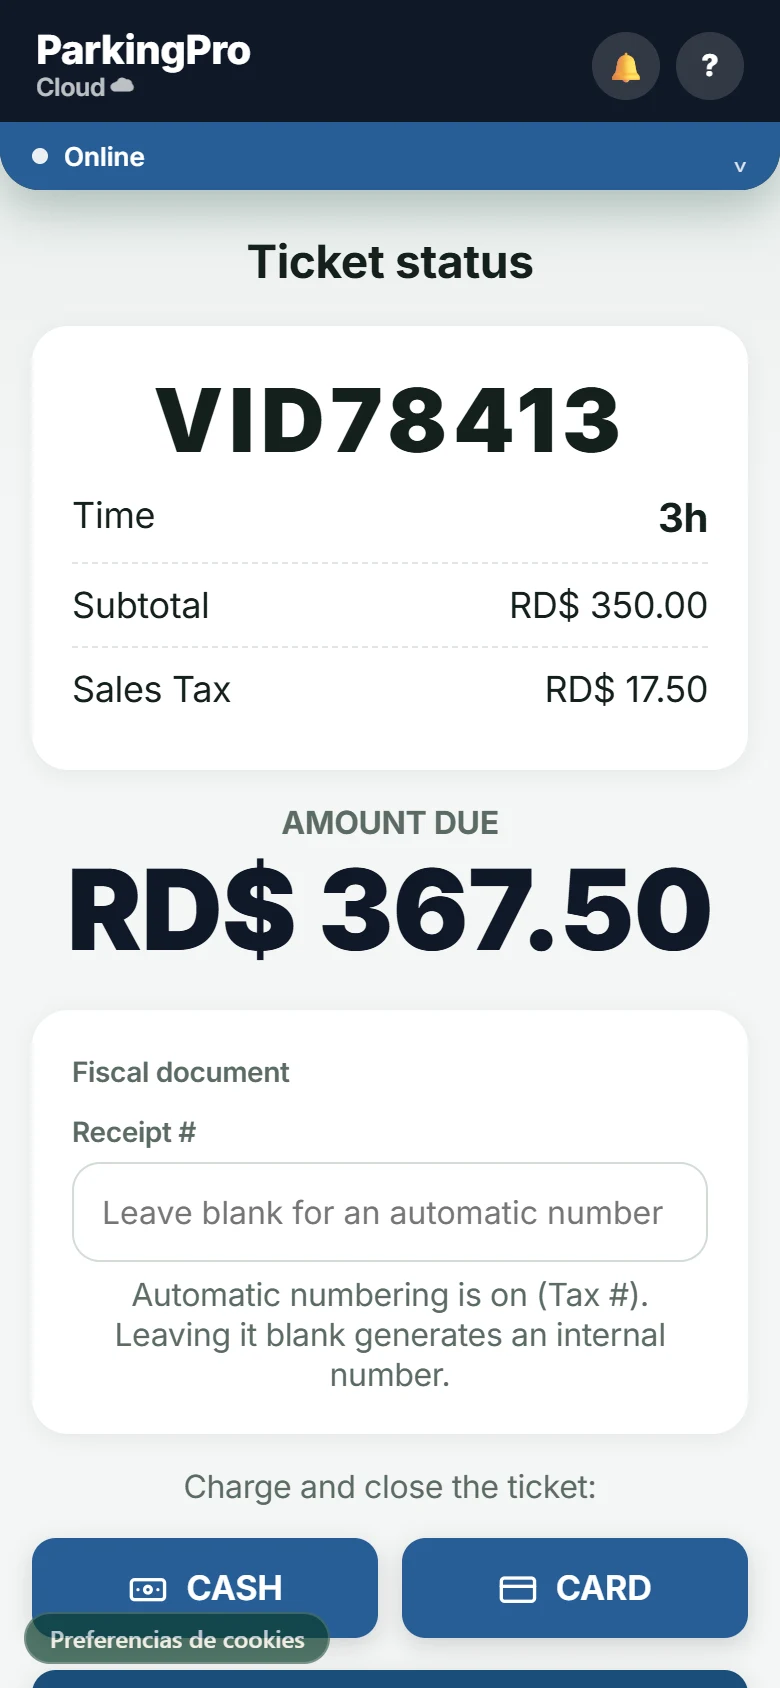
Check the amount
The system works out the time and the rate automatically. If the vehicle was within the grace period, it leaves free of charge.
-
Pick the fiscal receipt type (if it applies)
Depending on your business's country, it may ask you for the receipt type (for example, in the DR: final consumer or tax credit) and for customer details if that receipt type requires them. The screenshot alongside is from a US business, which has no fiscal module: it goes straight from the amount due to the payment.
-
Take the payment
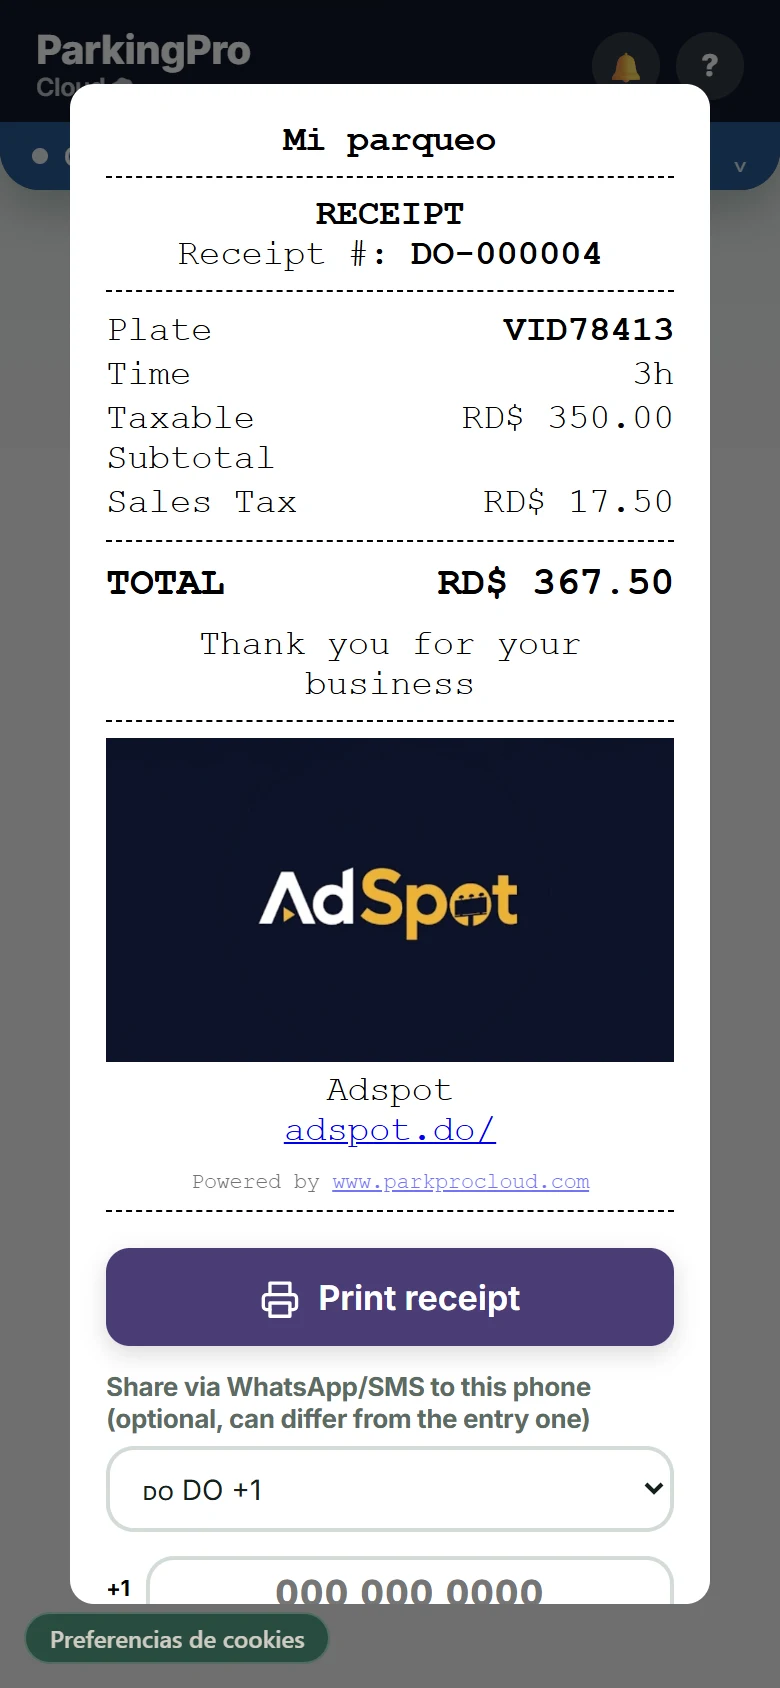
Choose cash or card. For cash, the system helps you work out the change. Confirm the payment to close the ticket and print the receipt.
Vehicles inside
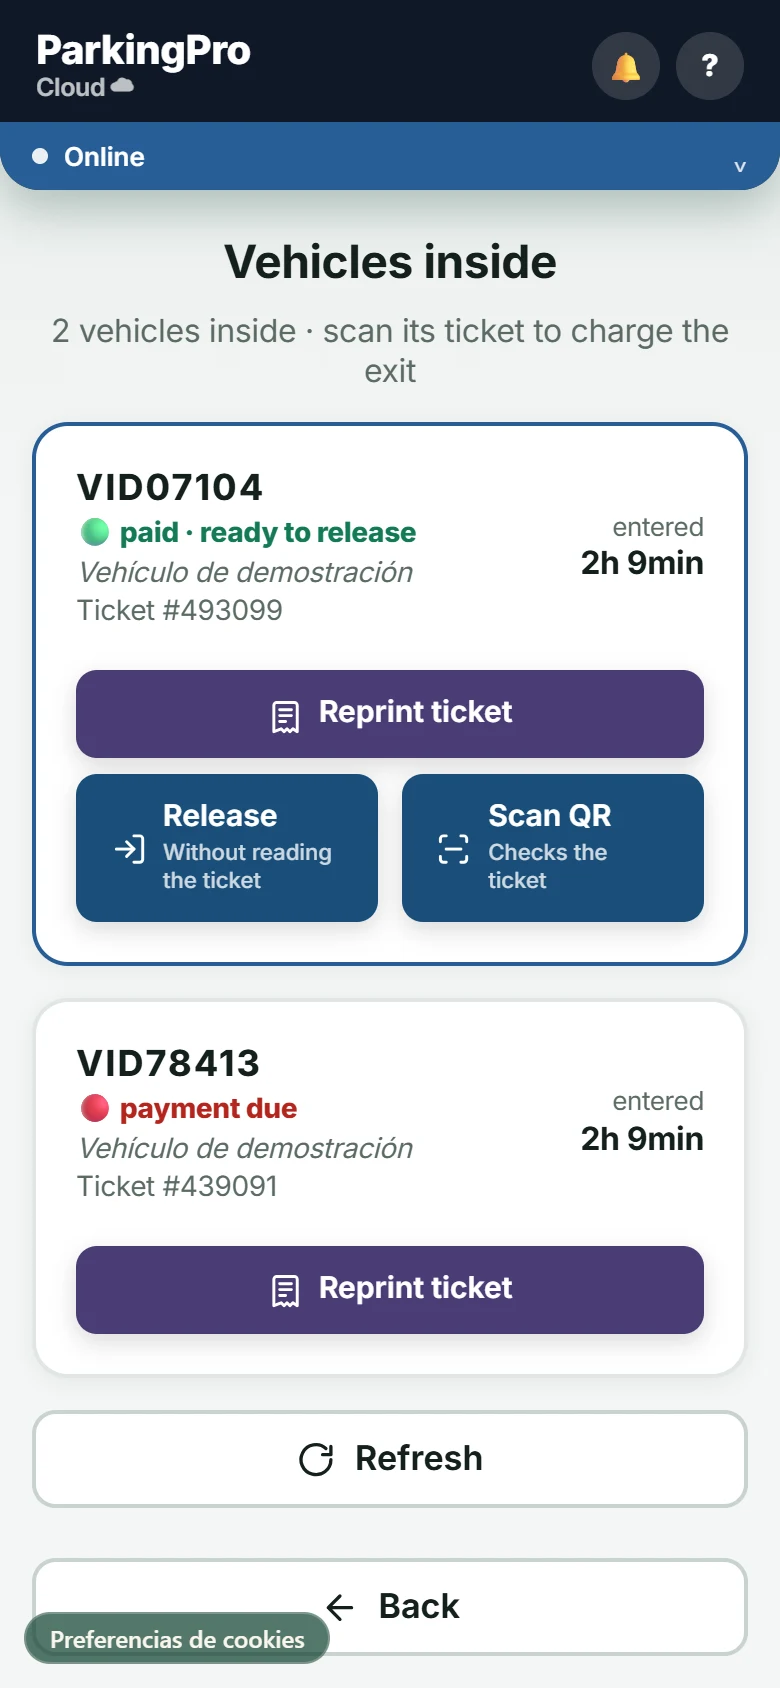
If a customer lost their ticket, go to Vehicles inside from the menu: you'll see a list of everything still on the lot, with its plate and entry time. Tap it to go straight to payment, no QR needed.
Reprint shift invoices
Forgot to print an invoice, or did the printer jam? From the menu, tap Reprint shift invoices to see every payment taken on your current register and print any of them again.
Close the register
-
Tap "Close shift"
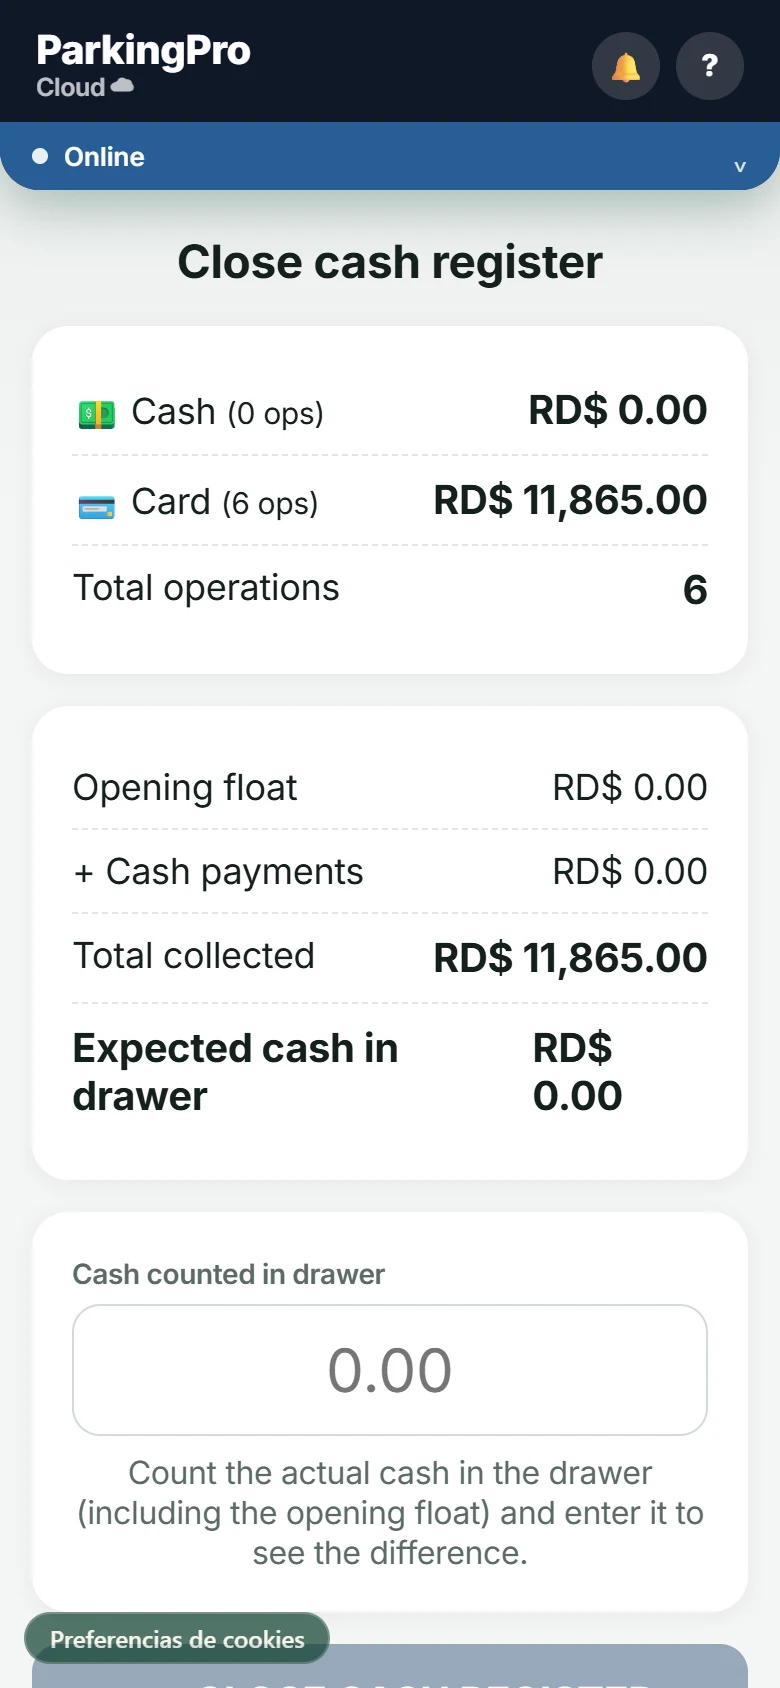
The system shows you how much was taken in cash and card, and how many operations you did.
-
Count the actual cash
Physically count the money in the drawer (including the opening float) and enter it.
-
Check the difference
The system automatically works out whether there's money over or short compared to what was expected.
-
Print the closing
Keep the printed report as your record of the shift.
Flat rate (valet)
Not every lot charges by the hour. If you run valet, an event, or a hotel's parking, go to Administration → Rates and switch How charging works from "By the hour" to Flat rate: the same fixed amount per visit, whether the vehicle stayed twenty minutes or four hours. The time is still measured and still shown on screen; it just stops affecting the price.
The register becomes the shift
On a flat rate, the app stops talking about the "register" and talks about the "shift": the menu shows Shift open / Shift closed and the button reads "Open shift". Closing works the same: it still asks for the counted cash, even if you took no payment through the app.
The rate can be $0
If you leave the fixed amount at 0, the ticket comes out free and the payment screen reads "$0 rate" instead of "Grace period", so it's clear this is a deliberate rate and not a grace window. Handy if all you want is the time log and the QR, and you charge outside the app.
Vehicle description
The entry screen has an optional Vehicle description field (for example, "Blue Toyota"). It's saved with the entry and shows under the plate in Vehicles inside, so you can find the car even when the customer doesn't have the ticket on them.
A second ticket for the keys
On a flat rate, with the printer connected each entry prints two tickets from a single tap of "Print": the customer's, and a compact duplicate (big plate, vehicle description, QR, and ticket number, with no business header) to clip onto the keys. That duplicate comes out again if you reprint the entry ticket from EXIT.
Sponsor advertising on tickets
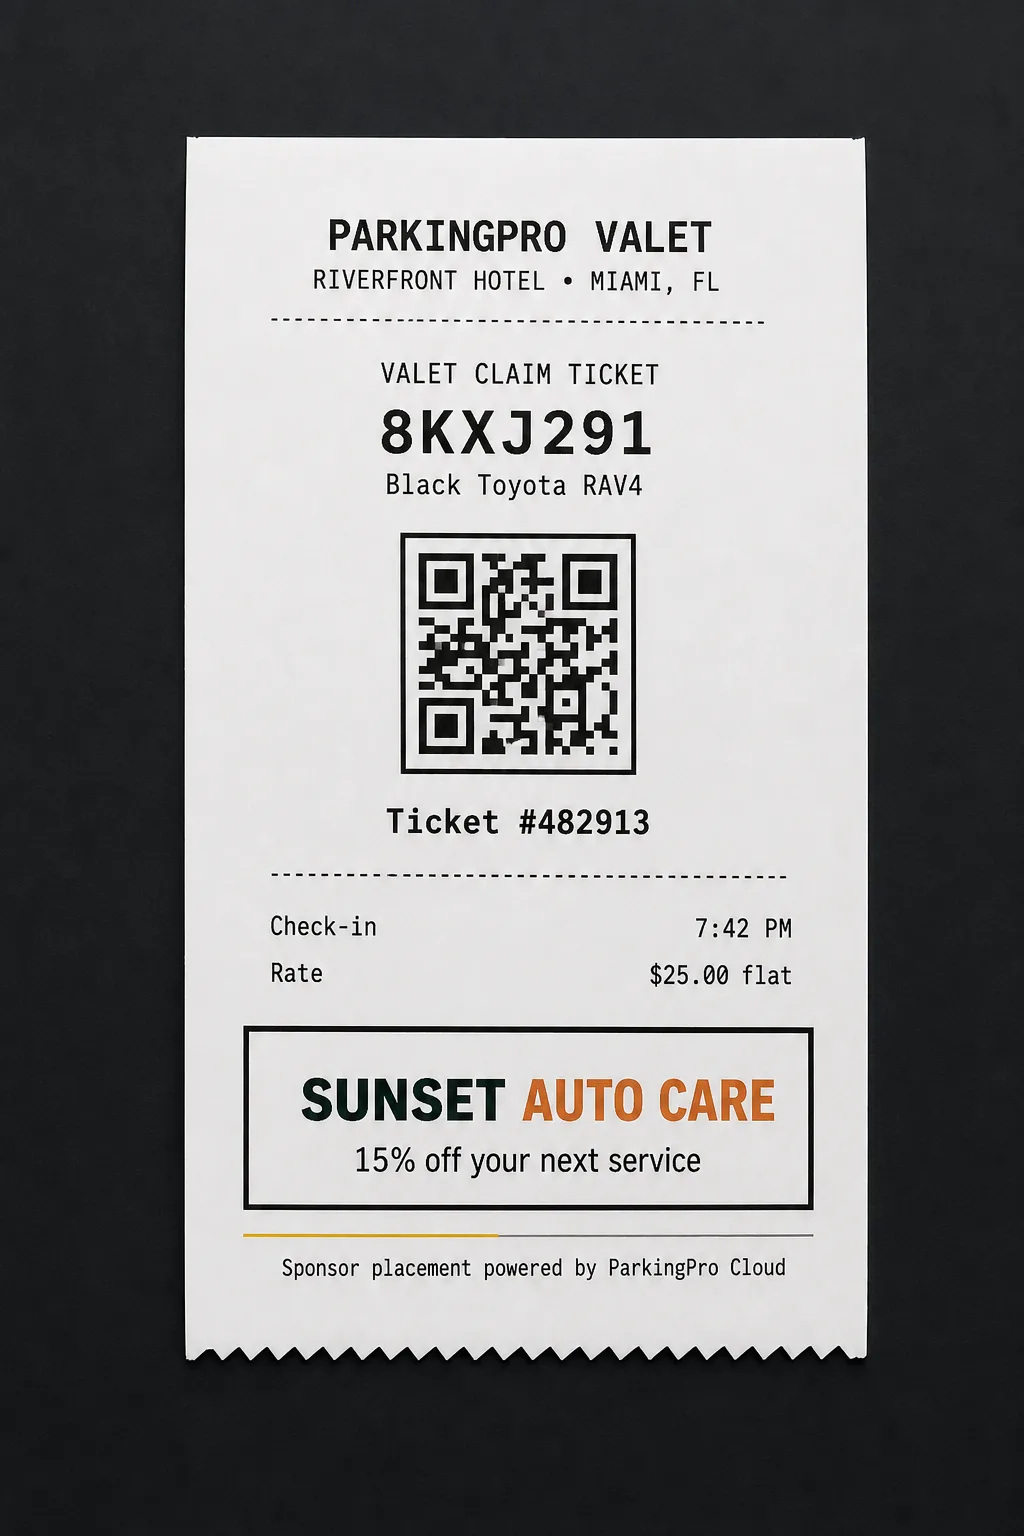
Sell the bottom section of every ticket and receipt to a local sponsor, such as a restaurant, dealership, car wash, insurance agent, or event partner. The sponsor logo and message appear on the on-screen/PDF version; Bluetooth thermal printers print the sponsor text.
What it costs
Starter and Pro: optional add-on for US$49/month. Enterprise and Enterprise Gate Annual: included at no extra cost.
How to turn it on
Go to Administration → Rates → Sponsor advertising. Activate the add-on if required, enable "Show on receipts/tickets", enter up to 120 characters, optionally paste a public logo/image URL, and save.
Connect the printer
ParkingPro supports 58 and 80 mm profiles. Under Administration → Printer, choose Volcora, generic ESC/POS, Star SM-L200, Epson TM-P20II, or AirPrint and leave Connection on Automatic. The selection is stored only on that phone, so each operator can use a different printer.
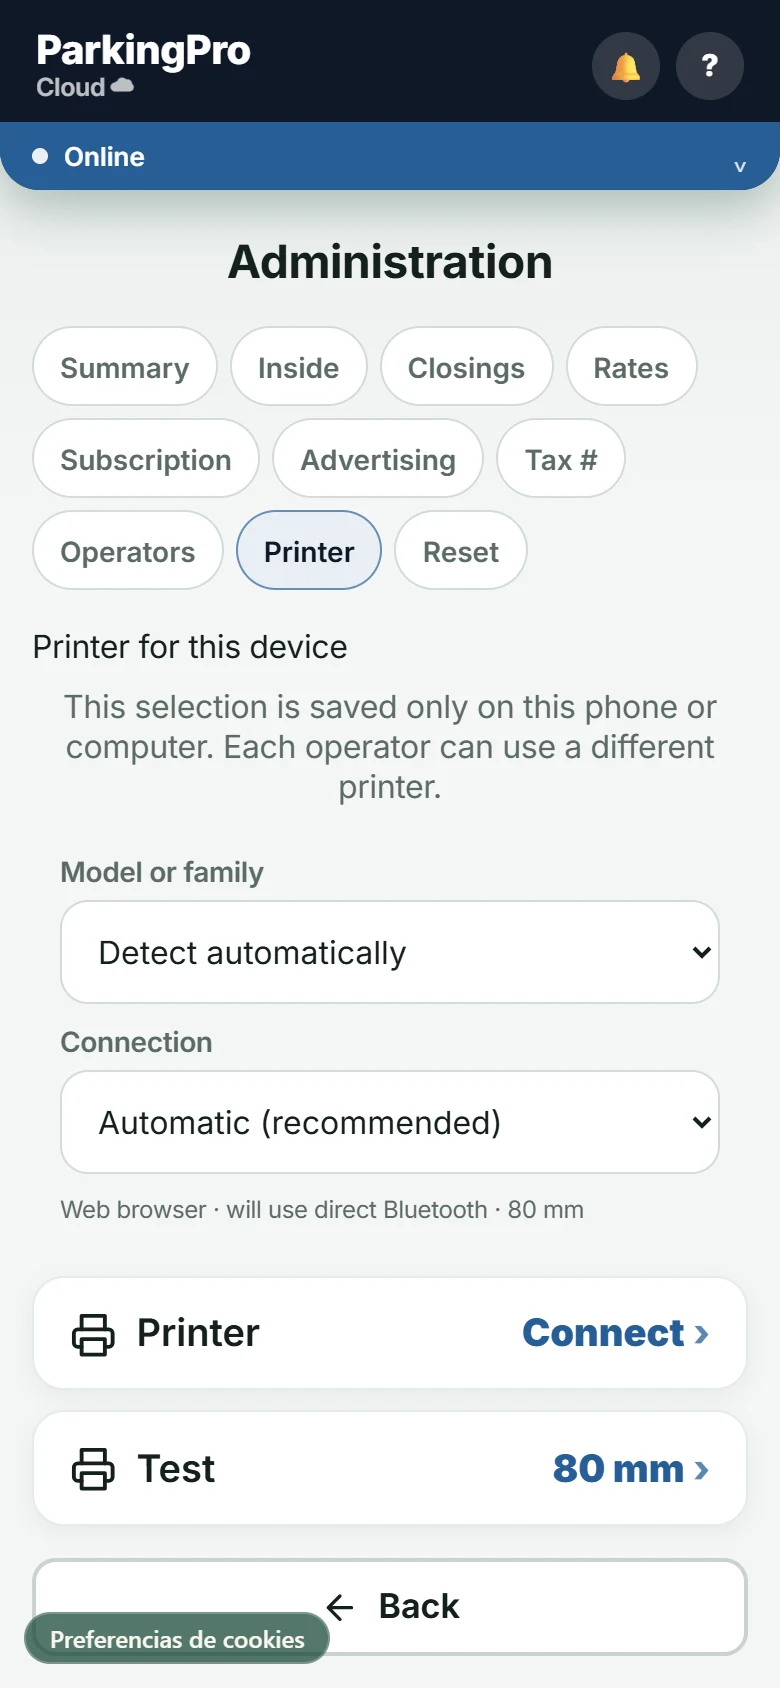
Option A: RawBT Recommended
For the Volcora 500203 and most low-cost thermal printers, which use classic Bluetooth (SPP): the browser can't see them directly; they need a bridge.
Option B: Direct Bluetooth (BLE)
For newer printers that support Bluetooth Low Energy. No extra app needed: Chrome connects directly.
-
Software to download: RawBT print service
You don't need to download it ahead of time: in the Menu, pick the RawBT (Volcora) mode and tap "Test". If the app isn't installed, Android automatically opens its Play Store page; install it from there (it's free).
-
Pair the printer in the phone's Bluetooth
Turn on the Volcora, go to Android Settings → Bluetooth, and pair the model (it shows up as "Volcora" or similar) with the factory PIN (usually 0000 or 1234; check the printed manual that came with the printer).
-
Select the printer inside RawBT
Open the RawBT app once, go into its connection settings, choose "Bluetooth", and pick the Volcora from the list of paired devices. RawBT remembers it from then on.
⚠️The printer is the entry at the very top of the list. On some phones that first row sits half-hidden under the edge of the screen and looks like it isn’t there: pull the list down until you can see it in full before tapping. Pick the wrong row and RawBT saves that choice, and then nothing prints. -
Go back to ParkingPro Cloud and test
In the Menu, with RawBT mode selected, tap "Test". A short test ticket should come out. From here on, every ticket and receipt is sent automatically.
With no printer on hand, the ticket or receipt shows on screen; you can print it on a regular printer or save it as a PDF from there.
Set up gates with Enterprise Gate
Enterprise Gate is a software licence, not a hardware bundle. ParkingPro does not sell, ship or install equipment: the Shelly 1 Gen4, the wiring, the labour and any other material are bought and installed by your own installer or trusted technician, following this guide. What the licence turns on is the authorization software, the part that checks the ticket is paid and asks the Shelly cloud to open the gate.
Enterprise Gate connects ParkingPro to the lot's gate through a dry-contact Shelly 1 Gen4. When a ticket is paid, ParkingPro asks the Shelly cloud (Shelly's own infrastructure, not a ParkingPro server) to send an OPEN pulse to the relay installed next to the gate controller. The relay does nothing more than imitate a press of the physical open button. No extra ParkingPro equipment is needed on site: the Shelly connects straight to the lot's Wi-Fi and to the Shelly cloud, exactly as in any home install done with the official Shelly app.
Electrical rating of the Shelly 1 Gen4
The Standard variant takes up to 16 A at 240 V AC or 10 A at 30 V DC on the output contact; the UL Certified variant, 15 A nominal. In Enterprise Gate the relay is always used as a dry signal contact in parallel with the existing push button, never to power the motor. Follow the controller's manual and the label on the installed unit; if it states a lower limit, use that one.
Shelly cloud, no extra box on site
The Shelly connects straight to the Shelly cloud over the lot's Wi-Fi, with the same official Shelly app you would use in any home install. ParkingPro talks to that cloud, not to the relay directly, so there is no gateway or extra ParkingPro box to install on site. What you do need is for the lot's Wi-Fi to reach the spot where the Shelly is mounted.
Materials needed (minimum)
This is what has to be bought and installed at the customer's expense before starting. There is no official Shelly 1 Gen4 photo under a free licence to reproduce here, because Shelly's media kit is restricted to distributors with an account, so the first two cards link the manufacturer's own page. The other two are real photos, generic ones with no particular brand, taken from Wikimedia Commons under a free licence.
Shelly 1 Gen4 Standard
Dry contact, up to 16 A at 240 V AC or 10 A at 30 V DC. Manufacturer's official page and photo.
Shelly 1 Gen4 UL Certified
Dry contact, 15 A nominal, UL certified. Manufacturer's official page and photo.
Enclosure, protections and terminal blocks
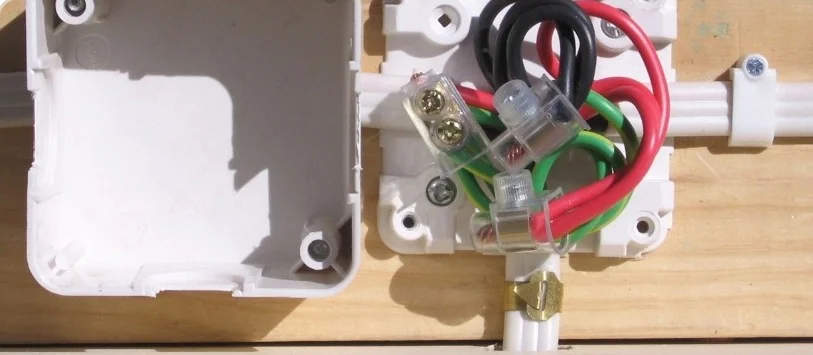
Generic example of an enclosure with terminal blocks. Photo by Fredquint, Wikimedia Commons, CC BY-SA 3.0.
Wiring and connectors
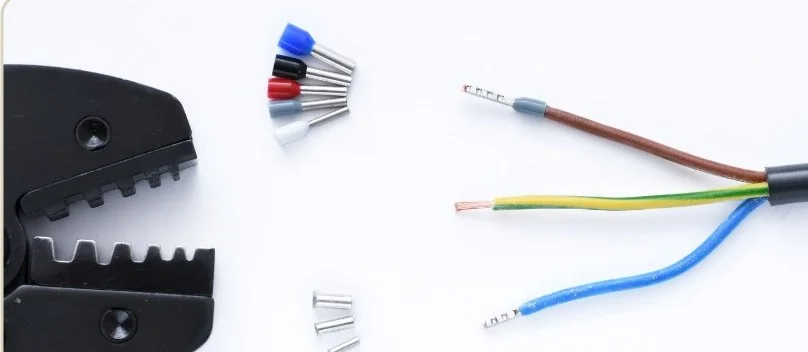
Thin signal cable with ferrule connectors. Photo by Simon A. Eugster, Wikimedia Commons, CC BY-SA 3.0.
What is "the physical gate"?
This photo is only a generic reference to the object: the vehicle barrier with its control cabinet that the lot should already have installed. ParkingPro neither sells nor specifies any gate brand (it can be FAAC, BFT, Nice, CAME or any other); it is simply so it is clear which physical part the rest of this guide is talking about.

Photo by Dietmar Rabich, Wikimedia Commons, CC BY-SA 4.0, cropped.
-
Mount the Shelly and wire the dry contact
With the gate powered down, the technician mounts the Shelly 1 Gen4 (Standard or UL, depending on the gate's electrical specification) near the controller and wires its dry-contact output in parallel with the physical open button that is already there. Never straight to the motor, and without touching photoeyes, safety loop or limit switches: those stay under the controller's exclusive control.
-
Connect the Shelly to the cloud
Power up the Shelly and connect it to the lot's Wi-Fi with the official Shelly app, the same procedure as in any home install, with nothing ParkingPro-specific in this step. From that app (in the device or account settings; the exact menu can vary by app version) write down three values the lot owner will need afterwards: the Shelly cloud host, the device's authorization key and its ID.
-
Time the full cycle
With a stopwatch, measure how long the gate takes to open and close again completely after one pulse, from the moment it starts moving until the arm is fully down, and round up. That number is the cooldown between pulses configured in ParkingPro: while the gate is still moving the system must not send a second pulse, because on a pulse-mode gate that can reverse the movement instead of doing nothing. This is not paperwork, it is a real safety measure.
-
Add the gate in ParkingPro
With the Shelly values and the cycle time in hand, the lot owner signs in as administrator and goes to Administration → Gates → Add gate. Pick the preconfigured profile that matches the installed controller (CAME G4040EZ / ZL39, FAAC 620/640 with the 624 BLD/MPS panel, Nice Wingo / WIL, BFT GIOTTO with the MERAK panel, or ZKTeco ProBG), or, if none of those match, Shelly Standard or UL Certified depending on the installed variant. Enter the name, location and whether it is an entry or an exit, and paste the cloud host, the authorization key and the ID the technician wrote down, along with the measured cycle time. If you don't have those three values on hand yet, you can still save the gate with just its name and profile, and finish the connection later with the Complete connection button in the list.
-
Test before operating
Tap Test connection: ParkingPro asks the Shelly cloud about this device and shows whether it answered and with what signal, without opening anything. Then tap Open test gate and check physically that it opened once, with no vehicles or people in the movement area, before leaving the gate running with real customers.
-
Check the diagnostics and what happens if something fails
In Administration → Gates you see whether it is connected, the last communication and the opening history with date, operator, result and latency. If the pulse fails or the Shelly cloud cannot be reached, ParkingPro shows the operator a retry button, and it never blocks a customer who has already paid. The gate can always be opened by hand as a fallback, just as before Enterprise Gate was installed.
Electrical specification taken from the official Shelly 1 Gen4 page. If the label or documentation of the installed unit states a lower limit, always use the lower limit.
Offline mode
If the internet goes down, the app keeps working: entries, exits, and payments are saved on the phone and sent to the server automatically as soon as the signal comes back. You'll see an "offline" notice and a count of transactions waiting to sync.
Splitting the shift by area
If one person runs your lot, you don't need to do anything: everything works as before and that person handles entries, payments and exits. But if you have several operators, you can give each one an area of the flow from Administration → Operators. Each person sees only their own part lit up; the other buttons stay visible but dimmed, so it's clear the system does more and nobody thinks the app is broken.
Entry
Registers the arriving vehicle, prints the ticket and shares it. Doesn't charge, doesn't release and doesn't see the register. After each entry it returns on its own to the home screen, ready for the next car.
Exit
The gate. Finds the vehicle by QR, code or plate, sees who asked for their car from the ticket, and releases it, but only if it has already been paid. If the ticket still owes money, the screen says so and gives no release button: the customer goes to the cashier first.
Payments
The cash register, and the only one who touches money. Opens and closes the shift, charges cash or card, issues the tax receipt and reprints invoices. It can also release: there is a Charge and release button for when the same cashier works the gate on a quiet shift.
Supervision
Watches only. Goes straight to the daily summary (entries, exits, vehicles inside, cash and card) and sees nothing else: no rates, no operators, no shift closes. Cannot register or charge anything.
Charging and releasing are no longer the same act
Charging a ticket used to close the visit in one go. With a split shift that no longer works: the customer pays at the cashier and then walks to the car. Now the vehicle stays counted as inside until someone opens the gate, which is what actually happens, and that is why occupancy finally tells the truth.
In Vehicles inside each car is marked: 🔴 must pay or 🟢 paid, ready to release. That list is the gate operator's working tool. The money doesn't move: the payment still counts toward the shift of whoever charged it, even if the car leaves hours later on another shift.
The chain has to be complete
Entry → Payments → Exit are three links and all three are needed. If you staff Entry but nobody is on Payments, vehicles come in and get trapped: nobody can charge them and, since the gate only releases what has been paid, they can't leave either.
That's why Administration → Operators shows shift coverage at the top, with the three links and any missing one in red; and operators get a warning on their home screen. The app doesn't forbid it (you have to be able to build the shift step by step), but while a post is empty the administrator has to be there to cover it, since they can do everything.
Administration
Open it from the main menu by tapping Administration (only visible to the admin role).
Summary
Daily totals: entries, exits, vehicles inside, and what was taken in cash/card.
Inside
Full list of vehicles currently on the lot, same as the operator view but with more detail.
Closings
History of past register closings. You can archive them or reprint any of the reports.
Rates
Set the price for the first hour, each additional hour, the grace period in minutes, the applicable tax, and your business details (name, address, tax ID). This is also where you pick how charging works: by the hour or a flat rate.
Fiscal docs
Fiscal setup: in countries with a local sequence (like NCF in the DR) you can load the authorized batches and see how many are left. In countries with an electronic receipt transmitted to a provider (like CFDI in Mexico), this is where you'll see the documents still waiting to be issued. Neither case applies in the United States: there's no national VAT and no government-mandated e-invoicing system, so no external provider needs to be connected: the receipt is just your own internal record. You can also generate the fiscal report for a date range and export it to CSV.
Operators
Add, edit, or deactivate your team's accounts. Each account signs in with email and password, with Google (same email), or both. Leave the password blank to create a Google-only account. Either way the new operator gets an invite email: with a password it carries a single-use "Set up my account" link that expires in 7 days; without one it just points them at "Continue with Google". You can resend it any time with Send email invite. The platform super admin creates lots and their administrators.
Reset SUPER ADMIN
Deletes test data (closings, registers, entries/exits and transactions). It doesn't touch rates or operators. Use it only before you go live: it can't be undone.
Set up your country’s tax document
A one-time job, under Administration → Tax #. The question is “Which tax document does this business use?” and the list is organised by country. In every case your business stays the issuer and the party responsible to the tax authority: ParkingPro never invoices on your behalf and never holds certificates under an account of its own.
None
No official tax document is issued, just a payment receipt. If your country isn’t on the list, this is the option: further down you set the currency symbol and the tax name so the receipt reads the way it does where you are.
Manual
Your business issues the official document on its own, outside the app. At payment the attendant types that number in and it stays on the parking receipt as a reference. Available for every country on the list.
Your own sequence
For countries where the authority grants you a range and you do the numbering: NCF and e-CF in the Dominican Republic, a CAI range in Honduras. You load the range you were granted and the app assigns the next number on each payment, in order and with no gaps.
Through a provider
You connect the account you already hold with your country’s provider (Facturama or Facturapi in Mexico, OpenFactura in Chile, Alegra in Colombia, Nubefact in Peru, among others) and the document is requested from the payment itself. These connections are being validated with real businesses: try yours before you rely on it for daily invoicing.
Loading your authorised sequences
If your country uses its own sequence, under Authorized sequences you load each batch you were granted, with its type, range and expiry date, and you see how many documents are left. As a batch runs low the app warns you (“N left. Request more sequences”) so you can ask for the next one before you're stuck mid-shift unable to invoice.
Subscription, plans and payments
Everything about what you pay for ParkingPro lives in Administration → Subscription. That is where you activate your plan, switch to another one, add ticket advertising or cancel. Payments are processed by PayPal and are always in US dollars (US$), whatever currency you charge your own customers in.
-
The 14-day trial
Every new account starts with 14 free days on the Starter plan. No card is asked for up front. The screen shows the exact date it ends.
-
Only Starter has a trial
Pro, Enterprise and Enterprise Gate Annual are paid from the start, with no trial period. If you want to try the system before deciding, begin on Starter and change plan whenever you like.
-
Activate before the trial ends
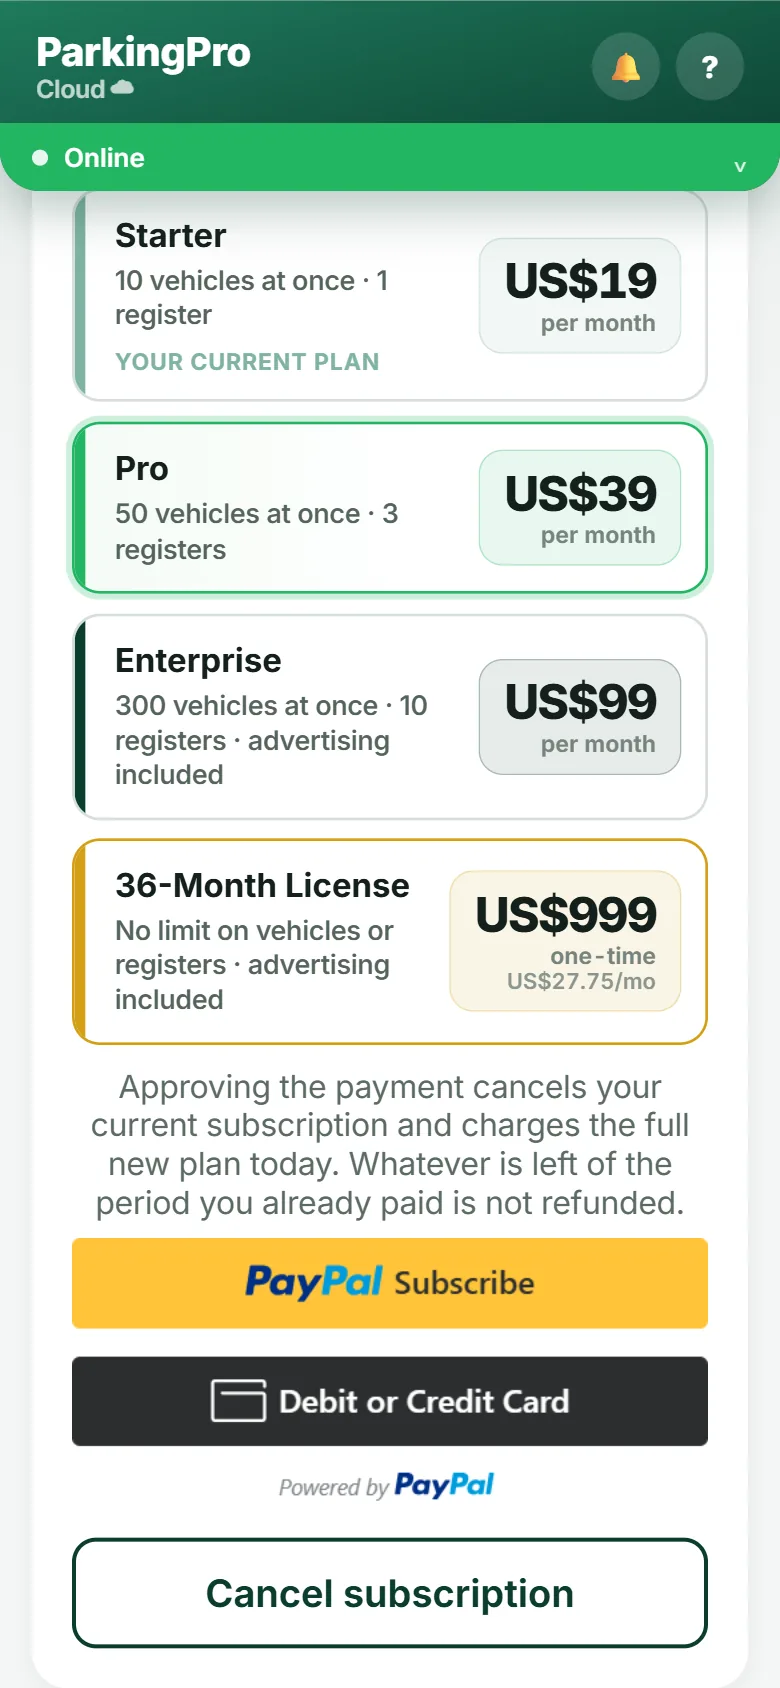
Pick a plan from the list and pay with PayPal. Each option states how many vehicles it allows at once, how many simultaneous registers, and whether ticket advertising is included.
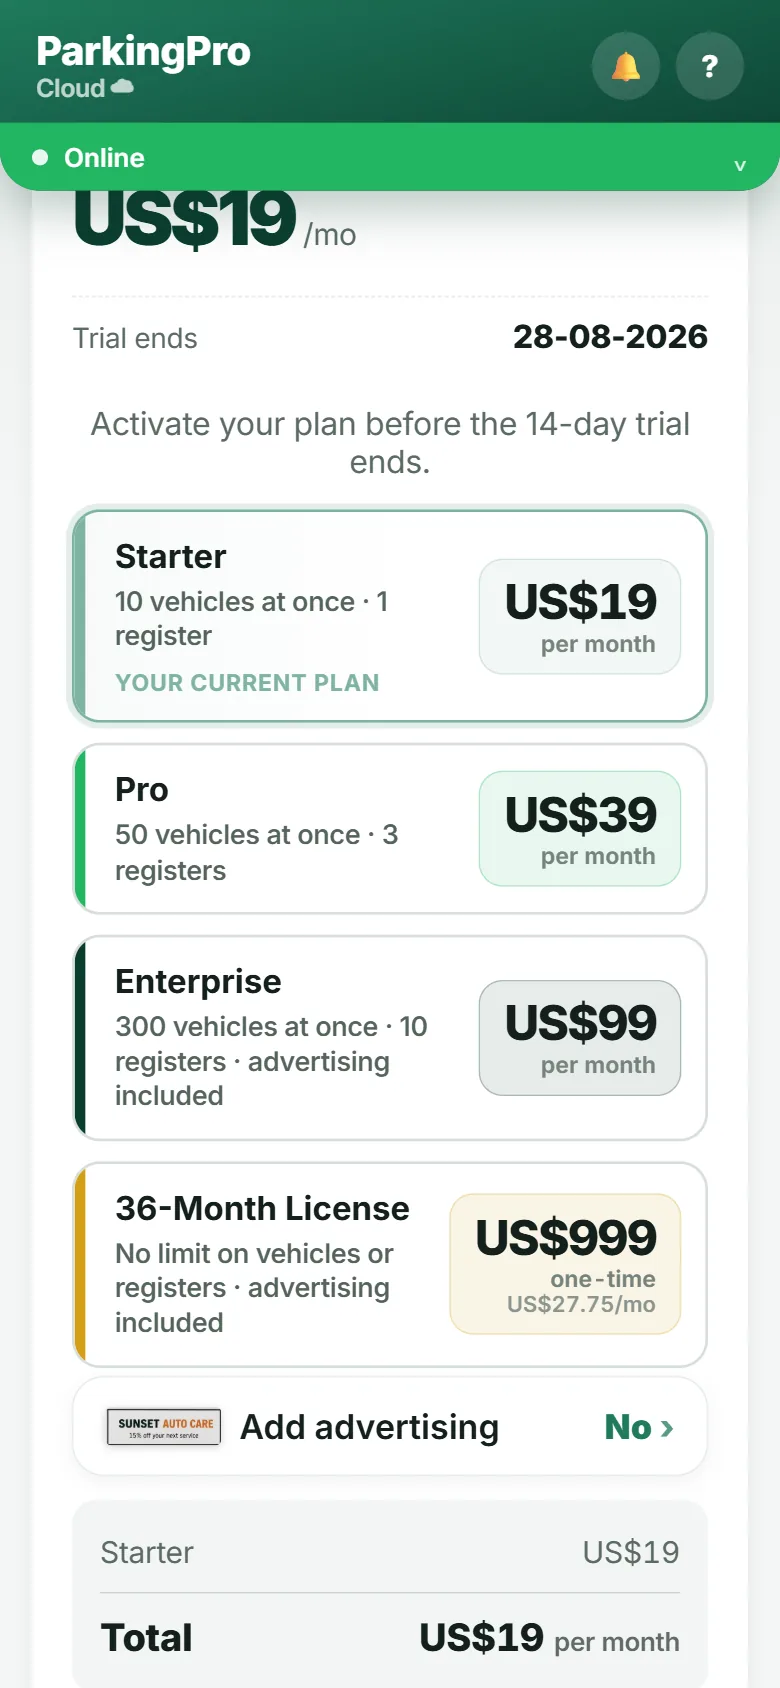
Changing plan
If you already have an active plan and need a different one, pick it from the same list and pay. Your current plan is marked YOUR CURRENT PLAN.
What happens when you approve the payment: your current subscription is cancelled and the new plan is charged in full that same day. Whatever is left of the period you already paid is not refunded, so if the new plan costs more it is worth switching close to your renewal date.
The new plan's limits (registers and vehicles) apply immediately.
Adding ticket advertising
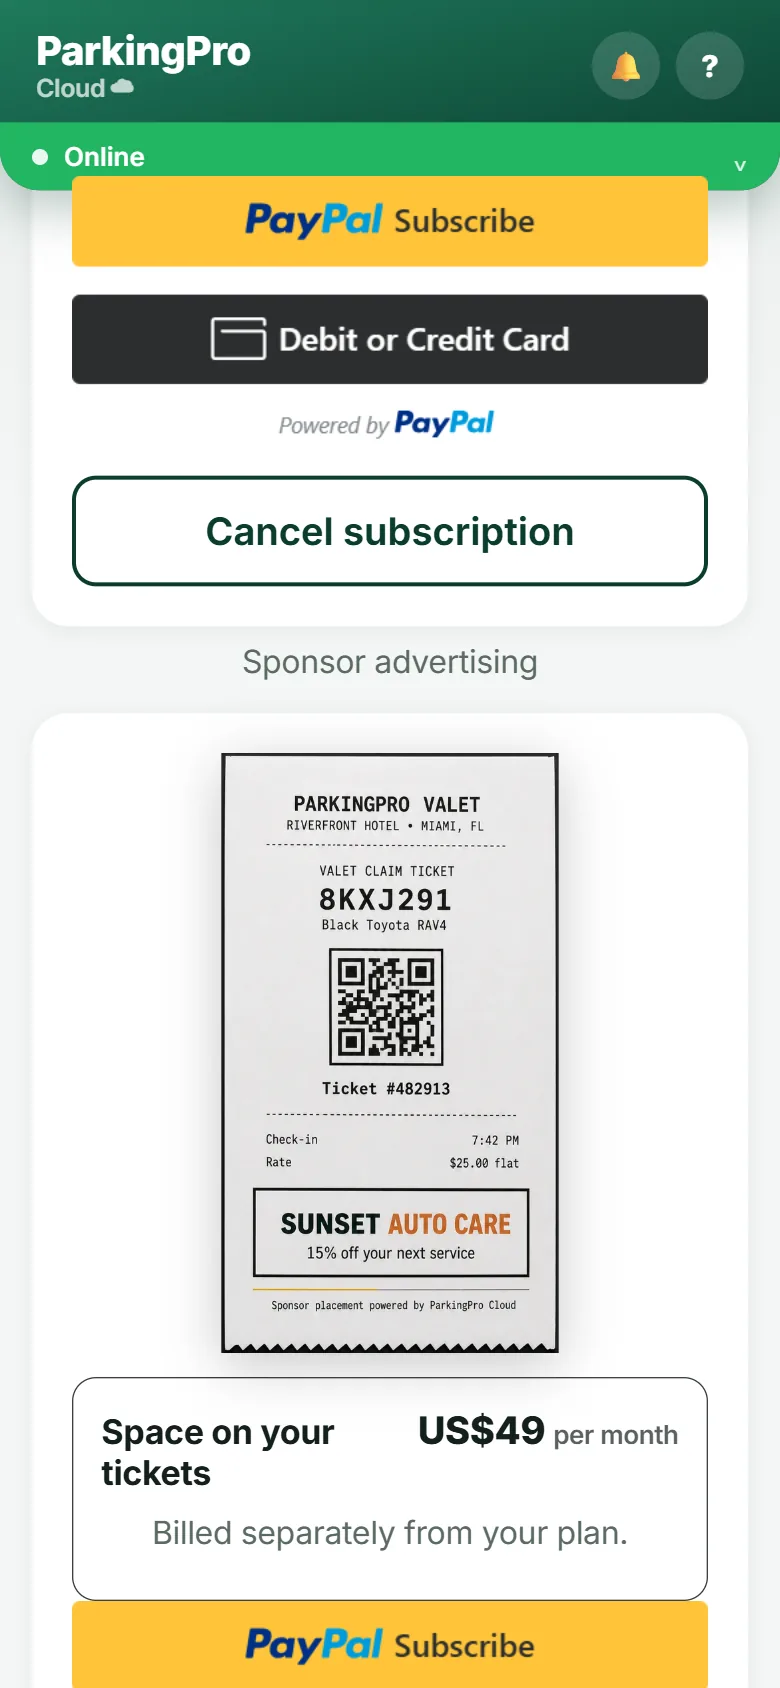
The sponsor slot on your tickets costs US$49 a month and can be bought in two ways:
- Together with the plan, while you are still on trial: check Add advertising before paying and both are charged as a single subscription. You see the breakdown (plan + advertising = total) before confirming.
- Separately, once you have an active plan: it is its own subscription and you can cancel it without touching the plan.
Enterprise and the Enterprise Gate Annual already include it at no extra cost; those plans are not offered the add-on.
Once bought, the ad itself is configured under Sponsor advertising.
Cancelling
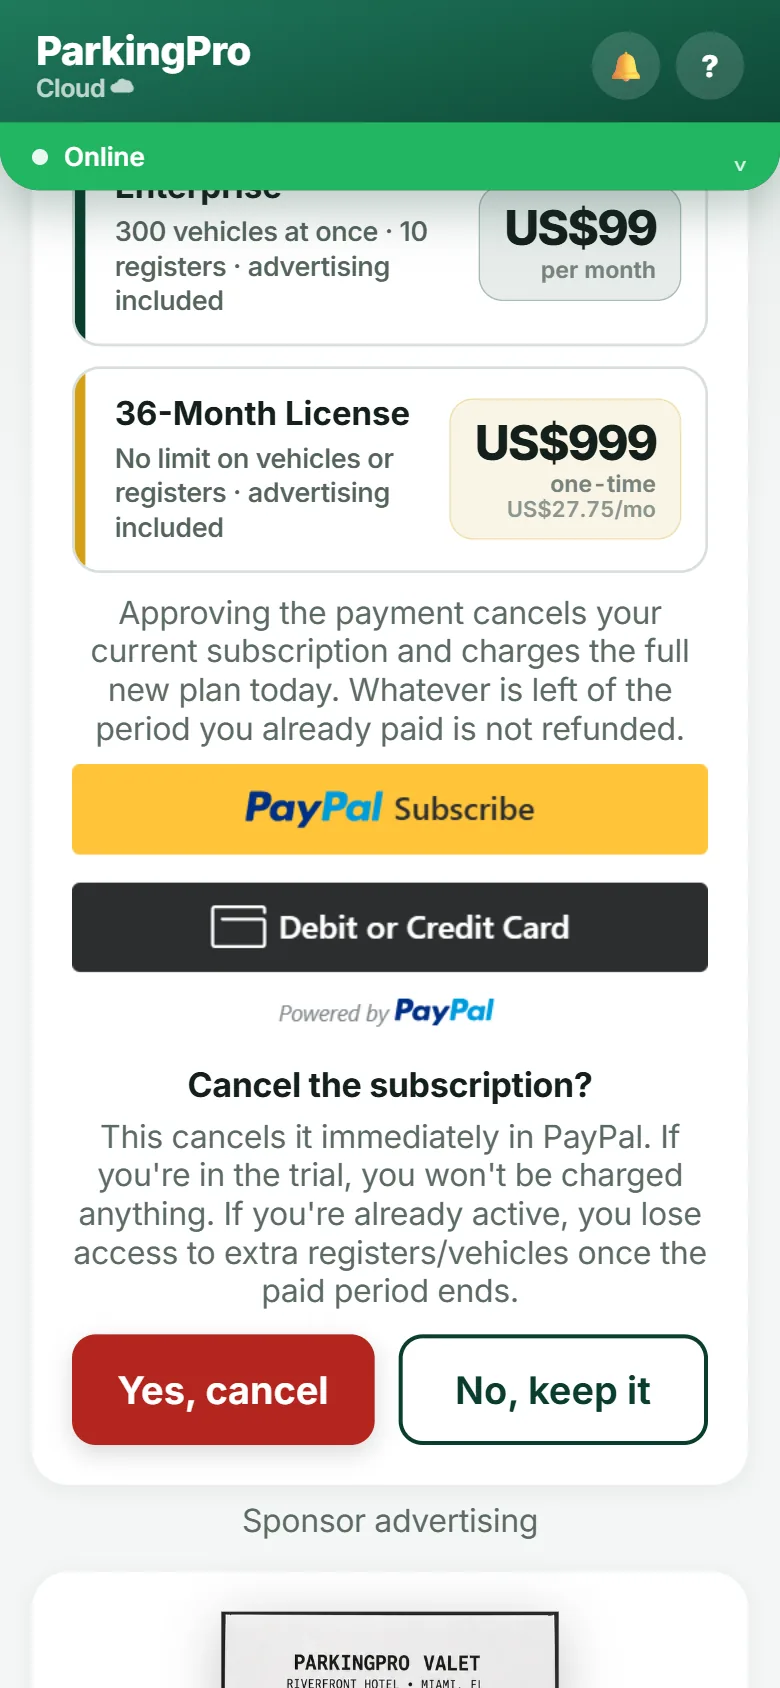
The Cancel subscription button sits at the bottom of the screen. The cancellation takes effect at PayPal immediately, but you keep access until the period you already paid for runs out.
If you cancel during the trial, nothing is charged.
The Enterprise Gate Annual is not cancelled: being a one-off payment, it simply does not renew when it expires.
If a payment fails
When PayPal cannot take a payment, the screen shows Past due and lets you subscribe again right there: pick the same plan or another one and pay with a working method. A new subscription is created and the previous one is cancelled, so you are not charged twice.
The footer on your tickets
Tickets and receipts carry Powered by www.parkprocloud.com at the bottom. The Enterprise Gate Annual is the only plan that can remove it; the toggle appears on that same screen once you hold the license. It can only be removed, not replaced with another brand.
Frequently asked questions
| Situation | What to do |
|---|---|
| The camera won't read the plate | Type the plate in by hand, or issue the ticket without a plate. |
| The customer lost the ticket | Look them up by plate under "Vehicles inside". |
| It says "Cash register opened by [name]" | Each operator has their own register; check with whoever opened it, or see whether your plan allows more registers at the same time. |
| I can't share the ticket via WhatsApp | Check that the customer's phone is in the right format (+ country code) and that WhatsApp or SMS is set up on the device. |
| We ran out of fiscal receipts | Ask your administrator to load a new batch under Administration → Fiscal docs. |